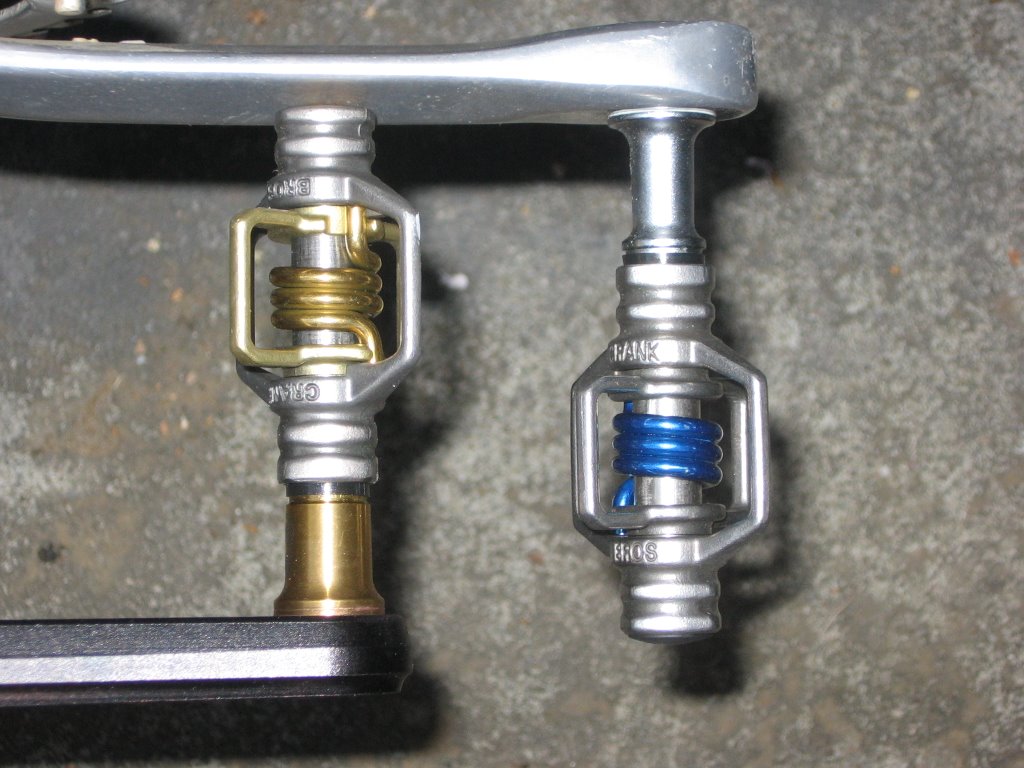
My Shimano SPD clipless pedals: the PD-M747 (XT groupset), purchased in 1992, was only re-lubed once in 2005; the PD-M737 (LX groupset), purchased in 1991, has never been disassembled and re-lubed; both are still going strong. The Crank Brothers Eggbeater pedals, however, require periodic lubrication. A maintenance interval of once per season seems to be the general consensus.
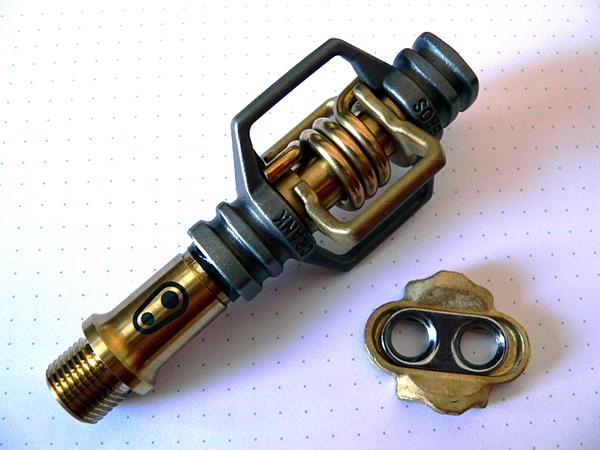
The steps outlined in this post feature the Eggbeater SL (blue spring). The procedure is identical for the Eggbeater 4Ti (gold spring).

As the Eggbeaters come with a grease port attachment, I purchased a grease gun:

It seems like a painless, 5-minute job: remove dust cap; install grease port attachment; squirt in new grease, wipe off the old grease (pushed out from the seals on the inboard side); reinstall dust cap; and you are done.
Call me anal, but I decided to double-check with the manufacturer — and I am glad I did:
Hello,
Thank you for your e-mail.
...we would suggest not using the grease port. We would rather you take the spindle out and grease it like that. Just unscrew the endcap and take the nut off - then pull the spindle out and re-grease.
Hopefully this helps,
Thanks
Anka Martin
anka@crankbrothers.com
Customer Service
www.crankbrothers.com
Sigh. So much for the grease gun. I guess I can resell it to the happy people flouting Section 377A of the Penal Code. :-P
The route recommended by Crank Brothers is more involved, but still relatively simple compared to the Shimano pedals: no special tools are required; there are no loose ball bearings to fall out; and the entire procedure can be performed without removing the pedal from the crank arms.

To reduce contamination of the internal mechanism, clean the outside of the pedal as much as you can. Then, use a 10-cent coin (Singapore) or a nickel (USA) to unscrew the dust cap. Tip: it is easier (and faster) to rotate the pedal body instead of the dust cap. Dust caps on both pedals are right-hand threaded. I.e. counter-clockwise to loosen.

Dust cap removed. The retaining nut and cartridge bearing are visible.

Use an 8 mm socket to remove the retaining nut. The nut on both pedals are right-hand threaded. I.e. counter-clockwise to loosen.

Retaining nut removed. Gently slide the pedal body out toward you.

Pedal spindle.

Use a paper towel to wipe off the old grease. A little rubbing alcohol on a paper towel is very useful in removing any remnants. Pay attention, in particular, to the threads for the retaining nut, and remove all traces of grease from them.

Ensuring that the parts are not mixed up is a good habit. This is also a good time to take an old toothbrush and wash/scrub the dust caps clean at the sink.

Retaining nut specifications:
Stainless steel Nylon insert locknut.
M5 thread. Socket size 8mm.
I was taught in automotive classes — and by my Dad, who taught Mechanical Engineering — that locknuts with plastic inserts should not be reused (unless they are reusable Nylok™ Blue Torq-patch™ locknuts). Curiously, Crank Brothers' advice deviates from this:
Hello,
You shouldn't need to replace the nut. If ever you need a new one, we can send you some.
Torque should be 30 in. lbs.
Thanks,
Anka Martin
anka@crankbrothers.com
Customer Service
www.crankbrothers.com

Looking at the way the pedal is designed, I can understand why Crank Brothers prefers eschewing the grease gun: with the retaining nut and pedal spindle blocking the center, the only way for the grease to get to the rest of the pedal is to push through the seals of the cartridge bearing. Ouch.

The inboard side of the pedal. Clean up any old grease from the lip of the seal with a Q-tip (cotton bud). Be careful not to introduce any dirt into the interior. (Here, you will appreciate having priorly cleaned up the outside of the pedal.)

Apply new grease to the pedal spindle, taking care not to get any on the threads where the retaining nut will mount. I use Teflon Bicycle Grease™, by Finish Line™. Phil Wood™ (of San Jose, CA) also makes an excellent grease.

Taking care not to get any grease on the retaining nut threads at the tip of the spindle, slide the pedal body back on. If you accidentally "catch" the cartridge bearing on the spindle tip and dislodge it, do not panic.

Use a paper clip or similar object to gently prod the cartridge bearing back in place. Do not use a sharp object such as a nail or pin as you may puncture or deform the seal.

Pedal body fully seated and cartridge bearing in place.

Wipe off excess grease from the seal lip on the inboard side.

If you are re-using the retaining nuts, clean both nuts thoroughly with rubbing (or denatured) alcohol and let dry. Put a small drop of Loctite™ 222 or 242 on the threads.

Install retaining nut.

Torque to 30 inch-pounds or 2.5 foot-pounds.

Put a small dab of Loctite™ Assure™ 425 on the threads of the plastic dust cap — if your Eggbeaters come with metal dust caps (i.e. Ti, 2Ti, Triple Ti, and 4Ti), use Loctite™ 222 instead — and reinstall.
Repeat the procedure for the other pedal.
Check and ensure that pedals rotate smoothly.
You are done. Go ride.
Related post
Crank Brothers Eggbeater servicing II

12 comments:
Brilliant guide - I shall be using this to get the bike ready for my next big trip!
Cheers.
Hey!
Thanks a lot for your guide. I am rebuilding some eggbeater C pedals for the first time, and am using your guide to do so. I might write up my own guide as I go and post it to the internet for kicks.
I followed your steps last night, but when I put the nut back on, there was a mm or 2 of play along the spindle/pedal body. Have you noticed this when you rebuilt yours? How do you deal with it?
Thanks Ben,
I followed your helpful guide when servicing my Eggbeater Tis. Too easy!
'Glad you found it useful, guys :-)
Rob, I believe the play is caused by the wear in the composite bushing. It is that yellow plastic sleeve / barrel that sits behind the black rubber sleeve on the inboard side. When the wear is too great or intolerable, a rebuilt kit needs to be purchased. Don't remove the bushing or the rubber sleeve (the latter has a metal backing) until you have the kit. This is because removal of the said parts often destroys them.
Hope that helps.
Nice guide thanks. One quick question, I too have the play along the axel and was about to order a rebuild kit, but I first thought I'd ask your opinion on another problem I have. I have play in the two halves which make up the cage, almost as if the spring has lost it's tension, this results in the cleats, new ones, pulling out of the pedal easier than when the pedals were new. Do you think the rebuild kit will resolve this issue? or do I need a more thorough overhaul?
Thanks in advance for any advice.
Hi Paul,
It sounds like your pedals have the same problem as my stainless steel eggbeaters. Basically, my guess is that the springs AND the collars of the wings of the pedal have worn into the sleeve. This results in a lot more play. You can marginally make it stiffer by using very slightly thicker o-rings (0.1 to 0.2 mm thicker, but good luck hunting it down). The pedals probably need a new pair of sleeves from Crank Brothers.
Mine are still sitting on the work bench. I guess I will get to it... someday.
:-D
Great post guys! It gave me a good idea on how maintain my eggbeaters and thanks god I didn´t bought the grease gun already! =P
Thanks for post this interesting article. I guess why the guys from C. Brothers don´t have a technical manual or procedure like this in their website. It will be very usefull.
Cheers!
Great post, saved me getting a lube gun and my pedals are now running like new!
Good write-up! No more juddering pedals, thanks.
I noticed that after I tightened the nut I got the axial play too, ~3mm. This stopped when I replaced the plastic end cap.
Before I started on the second pedal there was no play, when I removed the plastic cap the same play was there.
My pedals might need the rebuild kit and tightening the cap is a quick fix. The way the conical hub is angled made me expect the pedal to be tightened towards the centre of the bike, not pulled away from the centre by the cap if you get what I mean.
Also, some sockets are just the right diameter to push the bearing seal in :( Be gentle.
Thanks for the quick tip, Ryan! 'Glad it worked for you :-D That plastic cap fix might come in handy for use in the field.
Some of the rebuild kits I purchased came with machined aluminum end caps, others were the "push-in" plastic variety.
Nods about the sockets :-)
Ride on!
tried to remove the plastic dust cap but it start tearing! any idea how to remove it? thanks
To my knowledge, there are 2 types of plastic dust caps:
A) threaded with a notch for screwdriver / coin to unscrew (regular threading);
B) unthreaded, push-in type with no notch.
Use a quarter or a large screwdriver to remove A). For greater leverage, you can press against the dust cap with the coin / screw driver and rotate the pedal body.
For B), you can pry off the cap carefully with a sharp edge (BE CAREFUL!) and then switch over to a wide screwdriver later.
I must say that the threaded type has a nasty habit of jamming in the pedal body. The last resort will be to use a heated nail (of the same diameter as a Park Tools pin spanner or needle nose pliers) to melt two holes for leverage to remove it. Be careful not to go too deep and damage the cartridge bearing inside.
This procedure ruins the dust cap. You can find spare dust caps in the pedal rebuild kit offered by Crank Brothers.
I am having this problem with the alloy dust cap on my Eggbeaters 3Ti. The aluminum alloy has oxidized and seized against the titanium pedal body. The procedure will likely require a bench drill.
Fun. Fun.
*sigh*
Post a Comment